
Fluffy, Flavorful – No Kneading Required
There are certain recipes that seem too good to be true: simple, quick, and yet irresistibly delicious. This no-knead garlic bread is one of those recipes. It’s the kind of bread that will have everyone in the house hovering near the oven, waiting for that first golden slice.
Whether you’re making it for a family dinner, a casual gathering, or a weeknight indulgence, this garlic bread delivers soft, fluffy, and aromatic perfection—all without the fuss of kneading. Yes, you read that right: no kneading, no complicated techniques, just incredible bread.
⭐ Why This Bread Is So Special
This garlic bread works because it’s built around a simple philosophy: less stress, more flavor.
Here’s why it’s a game-changer:
🥖 No kneading required – perfect for beginners or anyone short on time
🧄 Garlic-infused flavor – every bite bursts with savory aroma
⏱️ Quick rising time – doubles in just about an hour
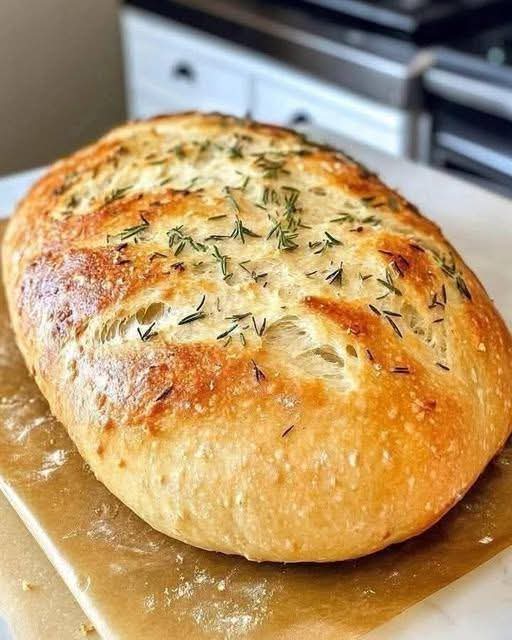
🍞 Soft, fluffy interior with a crisp, golden crust
💯 Failsafe recipe – works every time, even if your hands are lazy
It’s a bread that makes people swoon, and the best part is, it’s so easy to make that you’ll find yourself baking it again and again.
🧾 Ingredients
To make this heavenly no-knead garlic bread, you will need:
500g all-purpose flour
1 packet dry yeast (about 7g)
2 teaspoons salt
3 cloves garlic, finely chopped
350 ml warm water (around 105–110°F / 40–43°C)
2 tablespoons olive oil
Optional toppings or flavor boosters:
A sprinkle of fresh parsley after baking
Grated Parmesan or mozzarella for a cheesy twist
A drizzle of olive oil over the top before baking
👩🍳 Step-by-Step Instructions
🔹 Step 1: Mix the Ingredients
Start by combining the dry ingredients in a large mixing bowl:
Flour
Dry yeast
Salt
Finely chopped garlic
Once the dry ingredients are evenly mixed, add the warm water and olive oil.
Use a wooden spoon, spatula, or even a hand scraper to combine everything. The dough will be slightly sticky—don’t worry, this is exactly how it should be.
✅ Tip: Don’t try to knead it. The beauty of this recipe is its simplicity and minimal handling.
🔹 Step 2: Let the Dough Rise
Cover the bowl with a clean kitchen towel or cloth and place it in a warm, draft-free area. Let the dough rise for about 1 hour, or until it has doubled in volume.
This is where the yeast works its magic, creating air pockets and giving the bread a soft, fluffy texture.
Pro tip: If your kitchen is cool, you can preheat the oven to 50°C for 2 minutes, turn it off, and place the dough inside to rise.
🔹 Step 3: Prepare the Baking Dish
While the dough is rising, lightly grease a bread loaf pan or a baking tray. You can also line it with parchment paper for easier cleanup.
When the dough has finished rising, gently pour it into the prepared pan. Remember: do not knead it! You just want to guide it into the shape of the pan, keeping the bubbles and airy texture intact.
🔹 Step 4: Bake the Bread
Preheat your oven to 200°C (390°F) using top and bottom heat.
Place the bread in the oven and bake for 30–35 minutes, or until the crust is golden brown and the loaf sounds hollow when tapped gently.
During the baking process, your kitchen will fill with the irresistible aroma of garlic and fresh bread, drawing everyone to the oven in anticipation.
🔹 Step 5: Cool Slightly Before Serving
Remove the bread from the oven and let it cool for 10 minutes in the pan. This helps the interior finish setting while keeping it soft and moist.
Slice and serve warm, optionally brushing the top with a little olive oil or melted butter for extra indulgence.
🍽️ Serving Suggestions
This no-knead garlic bread is versatile and pairs beautifully with:
Pasta dishes like spaghetti, fettuccine Alfredo, or lasagna
Soups, especially creamy tomato or vegetable soups
Salads for a light but satisfying meal
Cheese boards or charcuterie spreads
For an indulgent twist, slice the loaf open and add a layer of melted cheese and fresh herbs. It becomes a garlic bread masterpiece everyone will fight over.
🔄 Flavor Variations
Even though this recipe works beautifully as-is, you can try these variations to mix it up:
Cheesy Garlic Bread: Sprinkle mozzarella or Parmesan before baking
Herb-Infused Bread: Add rosemary, thyme, or oregano to the dough
Spicy Garlic Bread: Mix a pinch of chili flakes into the dough
Garlic & Sun-Dried Tomato Bread: Fold in chopped sun-dried tomatoes for extra flavor
❌ Common Mistakes to Avoid
Even this forgiving recipe can run into minor issues. Avoid these:
Baking at too high a temperature, which can burn the crust before the inside is done
Over-handling the dough—this destroys the airy structure
Skipping the resting/rising time, which is essential for fluffiness
Forgetting to preheat the oven
Follow these steps, and the bread comes out perfect every time.
🧊 Storage Tips
Room Temperature: Store in a bread box or loosely wrapped in a kitchen towel for 1–2 days
Freezer: Slice and freeze portions for up to 3 months. Thaw at room temperature or toast slices straight from frozen
Reheating: Warm in the oven at 180°C for 5–10 minutes to restore crustiness
❤️ Why This Bread Works Every Time
No-knead bread can seem like a mystery, but this recipe proves it’s all about trusting the ingredients and the yeast. The garlic adds a fragrant, savory flavor that pairs perfectly with the soft, airy texture.
Whether you’re serving it at a dinner party or making it for yourself on a cozy evening, it’s guaranteed to impress. People will ask for seconds, and you’ll be happy to oblige because it’s so easy to make again.
🌟 A Message From the Kitchen
If you loved this no-knead garlic bread and want to keep receiving my recipes, please save it, share it, and comment below.
Your support means the world to me, and I promise to keep sharing simple, delicious, and foolproof recipes that make your kitchen adventures stress-free and full of flavor.
🔹 Quick Tips Recap for Perfect No-Knead Garlic Bread
Use warm water to activate the yeast
Mix ingredients gently; do not knead
Let the dough rise until doubled
Preheat the oven and bake at 200°C
Serve warm for maximum flavor
This bread is simple enough for beginners but impressive enough to serve at family dinners, holiday gatherings, or casual lunches. Once you try it, you’ll understand why it drives everyone crazy—and why it’s so easy to make repeatedly.